I’ve posted before on an issue I ran into with a timer job related to using an “SPDailySchedule.” That post didn’t show an example of creating and deploying a timer job end-to-end, so this post will.
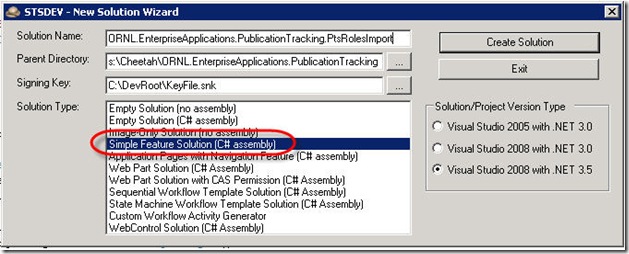
This walk-through assumes you’re using STSDEV (which I strongly recommend – saves a bunch of time). In STSDEV, choose a “Simple Feature Solution (C# assembly):
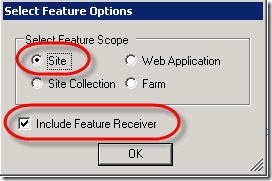
Also choose “Site” for the feature scope and remember to include a feature receiver:
STSDEV will give you the folder structure and FeatureReceiver.cs class you need to get started. For the timer job, we just need to create a class that inherits from “SPJobDefinition” and overrides a few events and constructors. (You’ll need to add “using” statements for “Microsoft.SharePoint” and “Microsoft.SharePoint.Administration.”)
All four of these constructors must be overridden. Here’s what my class looks like with just the overridden constructors:
using Microsoft.SharePoint;
using Microsoft.SharePoint.Administration;
namespace ORNL.EnterpriseApplications.PublicationTracking.PtsRoleImport
{
public class RoleImportTimerJob : SPJobDefinition
{
public RoleImportTimerJob() : base() { }
public RoleImportTimerJob(string jobName, SPService service, SPServer server, SPJobLockType targetType)
: base(jobName, service, server, targetType)
{
}
public RoleImportTimerJob(string jobName, SPWebApplication webApplication)
: base(jobName, webApplication, null, SPJobLockType.ContentDatabase)
{
this.Title = "PTS Role Import Timer Job";
}
public RoleImportTimerJob(SPWebApplication webApp)
: base("PTS Role Import Timer Job", webApp, null, SPJobLockType.ContentDatabase)
{
this.Title = "PTS Role Import Timer Job";
}
}
}
Override the Execute() Method
The Execute() method is where the real work happens when your timer job fires. The method signature looks like this:
public override void Execute(Guid targetInstanceId) { }
Add the logic required to make your Execute() method do what’s required from your timer job, then you’re about 90% done.
The last thing to do is use your FeatureReceiver.cs class to handle the installation and un-installation of your timer job.
FeatureReceiver Class
The FeatureReceiver.cs class that STSDEV provides should give you the skeleton you need for your feature receiver (it’s also automatically wired up the necessary entries in your feature.xml, which is handy).
We just need to tell our feature receiver class how to install and uninstall the timer job.
Here’s my overridden “FeatureActivated” method:
public override void FeatureActivated(SPFeatureReceiverProperties properties)
{
SPSite site = properties.Feature.Parent as SPSite;
// Make sure the timer job isn't already registered
foreach (SPJobDefinition job in site.WebApplication.JobDefinitions)
{
if (job.Name == "PTS Role Import Timer Job" || job.Title == "PTS Role Import Timer Job")
{
job.Delete();
}
}
// Install the job
RoleImportTimerJob timerJob = new RoleImportTimerJob(site.WebApplication);
// Set the schedule - nightly at 1:15 am
SPSchedule customSchedule = SPSchedule.FromString("daily at 01:15");
timerJob.Schedule = customSchedule;
timerJob.Update();
}
And here’s my “FeatureDeactivating” method:
public override void FeatureDeactivating(SPFeatureReceiverProperties properties)
{
SPSite site = properties.Feature.Parent as SPSite;
// Make sure the timer job isn't already registered
foreach (SPJobDefinition job in site.WebApplication.JobDefinitions)
{
if (job.Name == "PTS Role Import Timer Job" || job.Title == "PTS Role Import Timer Job")
{
job.Delete();
}
}
}


No comments:
Post a Comment