Monday, October 20, 2008

SharePoint Timer Jobs (in a little more depth)

I’ve posted before on an issue I ran into with a timer job related to using an “SPDailySchedule.”  That post didn’t show an example of creating and deploying a timer job end-to-end, so this post will. 

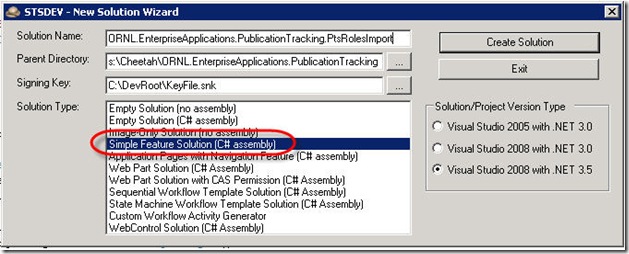
This walk-through assumes you’re using STSDEV (which I strongly recommend – saves a bunch of time).  In STSDEV, choose a “Simple Feature Solution (C# assembly):

1

 
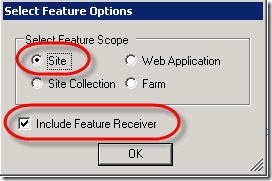
Also choose “Site” for the feature scope and remember to include a feature receiver:

2


STSDEV will give you the folder structure and FeatureReceiver.cs class you need to get started.  For the timer job, we just need to create a class that inherits from “SPJobDefinition” and overrides a few events and constructors.  (You’ll need to add “using” statements for “Microsoft.SharePoint” and “Microsoft.SharePoint.Administration.”) 

All four of these constructors must be overridden.  Here’s what my class looks like with just the overridden constructors:


using Microsoft.SharePoint;
using Microsoft.SharePoint.Administration;

namespace ORNL.EnterpriseApplications.PublicationTracking.PtsRoleImport
{
    public class RoleImportTimerJob : SPJobDefinition
    {
        public RoleImportTimerJob() : base() { }

        public RoleImportTimerJob(string jobName, SPService service, SPServer server, SPJobLockType targetType)
            : base(jobName, service, server, targetType)
        {

        }

        public RoleImportTimerJob(string jobName, SPWebApplication webApplication)
            : base(jobName, webApplication, null, SPJobLockType.ContentDatabase)
        {
            this.Title = "PTS Role Import Timer Job";
        }

        public RoleImportTimerJob(SPWebApplication webApp)
            : base("PTS Role Import Timer Job", webApp, null, SPJobLockType.ContentDatabase)
        {
            this.Title = "PTS Role Import Timer Job";
        }

    }
}


Override the Execute() Method

The Execute() method is where the real work happens when your timer job fires.  The method signature looks like this:

public override void Execute(Guid targetInstanceId) {  }


Add the logic required to make your Execute() method do what’s required from your timer job, then you’re about 90% done. 


The last thing to do is use your FeatureReceiver.cs class to handle the installation and un-installation of your timer job.


FeatureReceiver Class

The FeatureReceiver.cs class that STSDEV provides should give you the skeleton you need for your feature receiver (it’s also automatically wired up the necessary entries in your feature.xml, which is handy). 

We just need to tell our feature receiver class how to install and uninstall the timer job. 

Here’s my overridden “FeatureActivated” method:

public override void FeatureActivated(SPFeatureReceiverProperties properties)
{
    SPSite site = properties.Feature.Parent as SPSite;

    // Make sure the timer job isn't already registered
    foreach (SPJobDefinition job in site.WebApplication.JobDefinitions)
    {
        if (job.Name == "PTS Role Import Timer Job" || job.Title == "PTS Role Import Timer Job")
        {
            job.Delete();
        }
    }

    // Install the job
    RoleImportTimerJob timerJob = new RoleImportTimerJob(site.WebApplication);

    // Set the schedule - nightly at 1:15 am
    SPSchedule customSchedule = SPSchedule.FromString("daily at 01:15");

    timerJob.Schedule = customSchedule;
    timerJob.Update();

}


And here’s my “FeatureDeactivating” method:

public override void FeatureDeactivating(SPFeatureReceiverProperties properties)
{
    SPSite site = properties.Feature.Parent as SPSite;

    // Make sure the timer job isn't already registered
    foreach (SPJobDefinition job in site.WebApplication.JobDefinitions)
    {
        if (job.Name == "PTS Role Import Timer Job" || job.Title == "PTS Role Import Timer Job")
        {
            job.Delete();
        }
    }
}
Tuesday, October 14, 2008

Custom Build Properties in Central Team Build

I’m wrapping up the configuration of my Team Build in Team Foundation Server for a project, and ran into a problem with an MSBuild command.  My application writes to the SharePoint Unified Logging System (ULS) logs, and the class required to do that uses “unsafe” code.  Unsafe code causes the regular compiler (csc.exe) to throw an error while building in Visual Studio.  Overcoming that can be done in the IDE – simply open the “Properties” window for your project and check off “Allow unsafe code blocks” on the “Build” tab for all different configurations you plan to use (for example, “Debug” and “Release”). 

It’s less straight-forward when your build is happening on another box, namely the Team Server.  To do this (assuming you’ve taken the steps from Rob’s posts to set up central build to begin with), you simply need to add this property in your TFSBuild.proj file: 

  <CustomPropertiesForBuild>AllowUnsafeBlocks=true</CustomPropertiesForBuild>


As we become more standardized on using the ULS logs as our primary mechanism for diagnostics in SharePoint web parts and other artifacts, you might run into this.  If you do, hope this helps!

Silverlight 2 Released


The final-release version of Silverlight 2.0 was just released.  This includes the Silverlight runtime, Visual Studio SDK and tools, and some other tools like Microsoft Expression Blend 2 and DeepZoom Composer.  I’m uncertain if DeepZoom is actually an updated version or if Microsoft is just drawing attention to it with this release, but if you’re interested in the tool might as well grab the latest copy. 

Here’s the best link I’ve found that has links to download all the components, as well as tutorials and video walk-throughs: 

http://silverlight.net/GetStarted/


Enjoy!

Wednesday, October 8, 2008

Programmatically Upload Documents to a SP Doc Library


I’m rather late getting around to posting this, but for anyone who has to program against a SharePoint document library (or the SPListItems that those documents correspond to), I hope this can be a quick jump-start. 

While migrating a large enterprise application to SharePoint, we had to make sure that the EIGHTEEN GIGABYTES of documents came along with the rest of the application.  (For anyone who’s curious about the performance considerations involved in such an effort, I’d be glad to discuss). 

But as far as the actual uploading of the documents to the SharePoint document library, then subsequently setting a few properties on the newly-uploaded documents, I think once you check out the source code you’ll agree it’s actually rather straight forward. 

So I’ll let the source do the talking …

// Open the site and web
SPSite site = new SPSite(txtSite.Text);
SPWeb web = site.OpenWeb();
SPFolder docLibFolder = web.GetFolder(txtDocumentLibrary.Text);

// Read the file on disk into a FileStream
FileStream fs;
Byte[] docContents;
fs = File.OpenRead(fileName);
docContents = new byte[Convert.ToInt32(fs.Length)];
fs.Read(docContents, 0, Convert.ToInt32(fs.Length));

// Perform the actual upload to the SP doc library
SPFile uploadedFile;
uploadedFile = docLibFolder.Files.Add(documentTitle, docContents);

// The “.Add()” method return to us a reference to the document’s
// corresponding SPListItem object. Here we can set properies as needed.
SPListItem listItem;
listItem = uploadedFile.Item;

listItem["Title"] = documentTitle;
listItem["Name"] = documentTitle;

listItem.Update();

// Close our FileStream object to release the resources
fs.Close();

Custom SharePoint Timer Jobs


This post certainly doesn’t walk you through the steps of authoring a custom SharePoint timer job.  It does highlight one issue I ran into though while I was building one recently that seems to be a plain old bug.  After struggling with it for some time, I thought I’d drop a quick post with the hopes it will save someone else the headache! 

The structure of a customer timer job is actually pretty simple – you need a class that inherits from “SPJobDefinition,” that overrides a few constructors as well as the Execute() method.  The Execute() method defines what actually happens when your timer job elapses and gets fired. 

To install your timer job and register in Central Admin, you need a FeatureReceiver.cs class.  It’s not in the scope of this brief post to go through the details of the FeatureReceiver class (but of course email me if you’re stuck!).  The FeatureReceiver for my timer job overrides the “FeatureActivated” and “FeatureDeactivating” events.  The area that was giving me trouble was in the “FeatureActivated” event.  I wanted my timer job to run once per day at 1:45 am.  The code looked something like this:

// Install the job
AggregatorTimerJob aggregatorTimerJob = new AggregatorTimerJob(site.WebApplication);

// Set the schedule - run once daily
SPDailySchedule dailySchedule = new SPDailySchedule();
dailySchedule.BeginHour = 1;
dailySchedule.BeginMinute = 45;
dailySchedule.BeginSecond = 0;

aggregatorTimerJob.Schedule = dailySchedule;
aggregatorTimerJob.Update();


Seems simple enough!  However after hours of experimenting with the SPDailySchedule, and searching for answers, I simply could NOT get this thing to run on a daily schedule.  Most frustrating was that using an “SPMinuteSchedule” or “SPHourlySchedule” worked beautifully!

After much searching I finally concluded that using the “SPDailySchedule” approach seems to universally fail – that seemed to be the consensus amongst the community. 

So … the Workaround

I think this is an easier, more straight-forward approach anyway, so I hesitate to call it a “work-around” at all!  I ended up using the “SPCustomSchedule” class and defining its run schedule as a free-form string parameter as follows.  Works like a charm – on my environment, all the way through production without any issues!

SPSchedule customSchedule = SPSchedule.FromString("daily at 01:45");

aggregatorTimerJob.Schedule = customSchedule;
aggregatorTimerJob.Update();

Podcasting Kit for SharePoint (Sept. 2008)


I had been keeping my eye on this project on CodePlex for sometime, and the team recently dropped their September release.  The Podcasting Kit s really quite cool, and could provide and additional avenue for communication for within our Apps team, and possibly throughout the enterprise.  I could come up with dozens of uses for it, but I’ll spare you and simply cite the team’s description of its capabilities. 

It’s located on CodePlex here: 
http://www.codeplex.com/pks


What Can You Do With Podcasting Kit for SharePoint (PKS)?:
  • Listen and watch audio/video podcasts, anywhere on your PC or mobile device (Zune, SmartPhone, or any podcasting device)
  • Share content by producing your own audio/video podcasts and publish them on PKS on your own.
  • Connect and engage with podcasters via your integrated instant messaging program
  • Find the most relevant content using the five star rating system, tag cloud, search engine and provide your feedback via comments.
  • Get automatic podcast updates by subscribing to RSS feeds fully compatible with Zune and other podcasting devices
    • Simple RSS feed based on a defined podcast series
    • Simple RSS feed based on a person
    • Dynamic RSS feed based on search results (will be implemented later in 2009)
  • Play podcasts in real-time using Microsoft® Silverlight™ and progressive playback
  • Retrieve instant ROI and metrics with the ability to track the number of podcasts downloaded and/or viewed, instant feedback via rating system and comments, and subscribers via the RSS feed
  • Access the richness of SharePoint to extend the solution: workflows, community sub-sites, access rights, editorial and more
  • Customize your own PKS User Experience

Enable the “Delete” Button in Timer Job Definitions


This is a trick I picked up from Brett when we were deploying a custom SharePoint timer job last week.  Quite a handy trick that allows you to delete a timer job definition directly from Central Administration without the needed for the STSADM.EXE commands. 

From Central Administration > Operations > Timer Job Definitions, when you click on a job definition you see a screen similar to this:

TimerJobDeleteButton1


To enable the “Delete” button from this same screen, we simply have to modify an ASPX file under the “12” hive.  Under “\12\TEMPLATE\ADMIN”, find the file named “JobEdit.aspx” and open it with Notepad.  Find the line of markup containing:

OnClick="BtnDeleteJob_Click"

That control has its “visible” property set to “false.”  Simply change that to “true” and save the file.  Then refresh the page, and sure enough – we have a Delete button!

TimerJobDeleteButton2

Free Upgrade for VMWare Fusion Users


For anyone running their SharePoint virtual environment on a Mac with VMWare Fusion, VMWare announced a free upgrade for users who purchased version 1.x of the product to upgrade to 2.0. 

I’ve only played around with it briefly, but at a glance it’s a very worthwhile upgrade.  VMWare’s synopsis of the enhancements and additional features are below. And the download link is here: 

http://www.vmware.com/download/fusion/


Multiple Snapshots and AutoProtect

  • Save your virtual machine in any number of states, and return to those states at any time
  • New Snapshot UI to help you manage all the snapshots you have saved
  • Automatically take snapshots at regular intervals with AutoProtect

Shared Folders Improvement and Mirrored Folders

  • Shared Folders are easier to discover. New Shared Folders option in Status bar and Virtual Machine menu. Can open all Shared Folders or just a specific Shared Folder in the virtual machine
  • Greatly improved reliability of shared folders—now compatible with Microsoft Office, Visual Studio, and QuickBooks
  • Improved compatibility running Java applications from a Shared Folder
  • Map key folders in Windows Vista and Windows XP (Desktop, My Documents, My Music, My Pictures) to their corresponding Mac folders (Desktop, Documents, Music, and Pictures)

URL Handling

  • Click on a URL in a virtual machine and open it in your favorite Mac browser, or configure your Mac to open its links in a virtual machine
  • VMware Fusion supports opening URLs of the following types: Web pages (http, https), Remote Sessions (telnet, ssh), Mail (mailto), Newsgroups (news), File transfers (ftp, sftp), and RSS feeds (feed)

Application Sharing

  • Allow your Mac to open applications in the virtual machine—Finder can now open your Mac's files directly in Windows applications like Microsoft Word and Windows Media Player
  • Allow the virtual machine to open applications on your Mac—VMware Fusion can configure virtual machines to open their files in Mac applications like Preview and iTunes
  • VMware Fusion can directly open Windows programs (.exe) and installers (.msi) in a virtual machine just by double-clicking on them in Finder

True Multiple Display Support

  • VMware Fusion automatically detects multiple displays by default
  • Your virtual machines will recognize each display you connect to your Mac as a separate virtual display
  • Handles changes to resolution and display orientation automatically
  • Option to use one or all screens in Full Screen mode
  • Unity windows can be dragged between displays, and will maximize correctly to just the display they're on
  • Correctly handles plugging and unplugging displays
  • 3D supported on primary display when using multiple displays

Friday, October 3, 2008

Manually Getting to the “Web Parts Maintenance Page”


Certainly every SharePoint developer has dropped a custom web part onto a page that killed the whole page.  Sometimes SharePoint will prompt you with a link to reach the Web Parts Maintenance Page, sometimes it won’t.  On some occasions (when I’ve really broken something) SharePoint will provide me a hyperlink to the maintenance page, but clicking the link simply throws another irrecoverable error. 

Here are a few screenshots of this rather infuriating error:

1

Clicking the “Web Parts Maintenance Page” hyperlink results in something even less helpful:

2


The Fix / Workaround


So it’s helpful to be able to get to that “web parts maintenance page” for any page, at any time we want.  This might be common knowledge, but I’ll throw this little trick out there in case it can be of any help. 

For any web part page in your SharePoint environment, you can append the query string “?contents=1” after the “.aspx” link and get directly to the web parts maintenance page.  Works every time! 

For example, if your problem page is “http://localhost/sites/MyBrokenSite/default.aspx”, the URL to the maintenance page (where you can easily close or delete the problem web parts) would be “http://localhost/sites/MyBrokenSite/default.aspx?contents=1.” 

3


Hope that helps … enjoy!

-- Jon